
If you have recently added a custom domain to your WordPress.com site and want to harness the power of Cloudflare CDN, you have come to the right place. In this article, I’ll show you how you can add your WordPress.com site to Cloudflare for free.
Note: If your WordPress site is self-hosted is hosted on traditional hosts like Bluehost or DreamHost, please go through this Cloudflare tutorial instead.
Table of Contents
What is Cloudflare
Cloudflare is a content delivery network that also provides Internet security services and distributed domain name servers acting as a reverse proxy for websites. Cloudflare protects, speeds up, and improves the reliability of a website or mobile application.

Why you should use Cloudflare with WordPress.com
The main reason why you must use Cloudflare with WordPress.com is that it allows you to compress and cache your web pages which are otherwise not possible. Also, it can help the pages load in a faster manner for end-users by loading the scripts first that are actually required and pushes the other requests down.
Moreover, it can allow you to use Google Analytics on your WordPress.com site for free. Without Cloudflare, you’d need to be on their Business or eCommerce plan to do that. Also, Cloudflare gives us options to obfuscate email addresses, hide specific content from suspicious visitors, protect your images from off-site linking, and more,
Here’s the GTmetrix performance report for this site when it was hosted on the WordPress.com Personal plan along with Cloudflare –
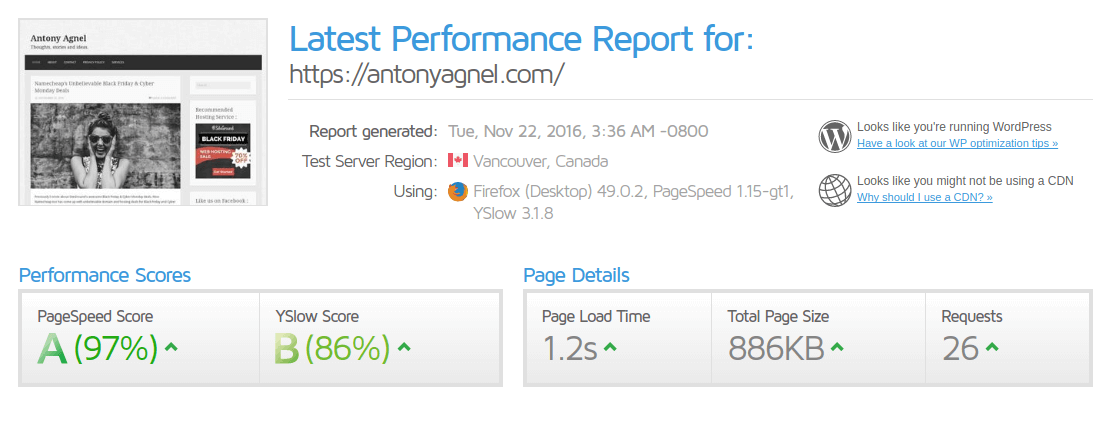
Here’s the full GTmetrix performance report for my blog – Download/View the PDF.
Steps to add WordPress.com site to Cloudflare
Step 1 – If you haven’t got an account yet, get one from Cloudflare.com.
Step 2 – Login to your Cloudflare Dashboard.
Step 3 – If you’re new to Cloudflare, click here to enter setup and enter the domain name you want to add to Cloudflare, and hit ‘Scan DNS Records‘. It will take around a minute or two to finish scanning the records. Once the scan is complete, hit ‘Continue Setup‘ to proceed to the next step.
Step 4 – In the next step, you need to delete the A records. The scanning process from Cloudflare picks up multiple A records for your domain and displays it along with the other records. This step is very important because your website won’t have a static IP address on WordPress.com’s cloud infrastructure. It will keep changing as they shift data centers.
***Make sure you do NOT delete the other records, such as mail, MX, TXT, etc***
The A records look like 👉 A yourdomainname.com IP address
Step 5 – In this step, add a CNAME record 👉 yourdomainname.com is an alias of lb.wordpress.com
It should look something like this –

Don’t forget to replace my domain name with yours!
NOTE: Make sure all the clouds are orange. If not, click on the grey cloud to make it orange. Now all the traffic will go through Cloudflare.
Step 6 – Now finish the setup, that is, follow the onscreen instructions to complete the configuration.
Step 7 – Now, you will need to change your name servers to Cloudflare’s instead of your domain registrar’s. If you registered your domain through WordPress, use this link to go to the domain configuration page. You will need to turn off the option ‘Use WordPress.com Name Servers‘. Then enter the name servers Cloudflare provided you with. Don’t forget to save the custom name servers.
NOTE: If you had registered your domain name through any other registrar than WordPress, then you will need to change your name servers from there. Here’s an easy tutorial by Cloudflare on how to do that.
That’s it. We have finished configuring the WordPress.com custom mapped domain with Cloudflare.
Don’t forget to log in to your Cloudflare dashboard and recheck the name servers to make your domain active on Cloudflare. You can follow the steps given over here to perform the same.
Once your website is active on Cloudflare, you can :
- Adjust your website’s Security Level
- Set Caching Levels
- Set Browser Cache Expiration
- Turn on Always Online™
- Auto Minify Static Assets
- Turn on Rocket Loader™
- Enable Automatic HTTPS Rewrites, etc.,
Feel free to play with Cloudflare’s settings. If you’re unsure of any option just perform a quick search and you will get the answers. Or, you could just leave a comment below!
I hope you found this guide to adding a WordPress.com site to Cloudflare useful.
Also Read: Redirect non-www URLs to www using Cloudflare.
Hi there,
If I am gonna do this, when I try to access mydomain.com, is it just gonna redirect to my WordPress.com site? Or is it gonna show up my WordPress.com site but masked with my domain name?
Hey there, it should work fine if you have properly mapped your custom domain name (mydomain.com) to your WordPress.com subdomain (mydomain.wordpress.com). Please follow this support document to map your domain name to your WP.com site. If you have masked the domain name instead of mapping it, it won’t work properly. To map a domain name you already own to your WP.com site, you need to upgrade to one of their paid plans. You can get started by clicking on this link and viewing their latest plans. Hope that helps.
If you need any further help regarding this, just don’t forget to mention your custom domain name & the WP.com subdomain in the comment section and I’ll take a look at it.
Hello, and thank you for this helpful article!
I am moving my WordPress.com site to a new host. While implementing this, I also want to make my domain registrar (current – Automattic Inc.) independent of the hosting provider. So my question is – would following your advice here, update my domain registrar (as shown on whois.net) to Cloudflare?
Hey Abhijeet, your domain registration will still be managed by Automattic but your DNS Records will now be handled by Cloudflare (and yes, the WHOIS records will display Cloudflare’s NS instead of Automattic’s NS). Hope that clarifies your doubts.
Thank you Anto. Yes, it does help clarify the distinction between domain registrar and DNS provider 🙂
And, if you do not mind me asking, brings up a separate question about DNS records – lets say, today I point WordPress.com to Cloudflare.
After moving the site (to Bluehost), do I need to update both WordPress & Cloudflare OR only Cloudflare records to point to Bluehost?
In this case, just modifying your DNS records at Cloudflare is enough – you won’t be able to add DNS records at WordPress.com once you have changed the nameservers to Cloudflare.
Cool. That should get me started!
Thank you once again for this post and your helpful comments. 🙂