
Though most of my readers already own a website, there are some newcomers who stumble over my content and few of them have asked me to guide them to create their own website from scratch. Some of them already own a domain as they mistook that registering a domain name equals the creation of a website! Shouldn’t blame them as some domain registrars (I don’t want to name them) advertise falsely that registering a domain name gives you a free website, hiding the fact that it is either a one-page HTML site or a pay-as-you-go website builder.
There are many people who are interested in digital marketing but they do not own a website. Now, that’s something to worry about. The very first thing you need as a digital marketer is your own website – a place for you called ‘home’ on the internet.
Today, I’m going to go through the process of creating your first website from scratch. Also, I have tried my best to keep things as simple as possible so that it is easy for you to understand.
Table of Contents
Getting started
I will be making use of WordPress to build your website – you will realize why I chose it over other platforms in the long-term. Using WordPress, we can set up your website is less than ten minutes. The time taken by you to install and set up WordPress will reduce every time as you get better at it. Moreover, WordPress is powerful, fully customizable and easy to use.
Hosting your website
The first thing your website needs is a place to live, where all your website’s files can be stored safely. Many people do not understand why they need a hosting service for their website. A website is nothing but a collection of files (documents and images) on the internet and these files need a place to reside so that anyone can connect to it and load the files in their browser.
Hosting your website on a server allows users to connect to it through the internet.
Here’s where the hosting companies come into play; they offer you space to host your website on their servers for a price. Once you purchase a plan from them, they allow you to upload your website’s files to their server. After you connect a domain name to your server (Step 2 coming ahead) anyone can visit your website over the internet.
Continue reading how to choose the best hosting for WordPress (along with recommendations).
Registering a domain name
It’s time for you to start thinking about what topic your website will be based on. If you have already decided on it, well and good. If not, have a cup of coffee, sit around and ‘think’. Selecting an apt domain name for your online presence is an important step as it is gonna be your name online. If you are really creative, you can come up with a good name by yourself.
Here are a few things to keep in mind before selecting a domain name –
- Keep it short and easy to type
- Avoid numbers and hyphens
- Keep it memorable
- Use appropriate keywords
- Choose a good domain name extension
I suggest you go with Namecheap to register your domain name though it really doesn’t matter which domain registrar you choose. Also, you can use tools like NameMesh and Panabee to generate ideas for domain names to select from. Alternatively, you can also read my post on how to choose the perfect domain name for your blog or business for a better understanding (or guidelines) on how you should choose your domain name.
Once you’ve chosen the perfect name for your domain, you need to register it and then point it back to the nameservers provided by your hosting provider.
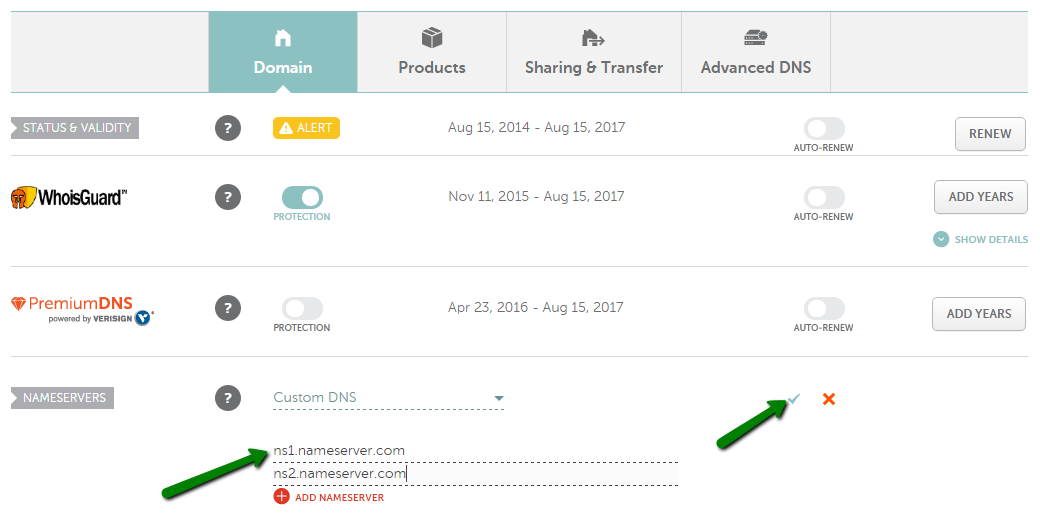
Changing the nameservers for your new domain name is a fairly simple process and won’t take long to figure out. But remember, it may take up to 24 hours for the DNS changes to propagate across the internet.
Building your website using a CMS
A CMS is nothing but an acronym for a content management system. It is used to manage the content you will be producing on your website as it makes the job of posting new and editing old content online a whole lot easier. It also allows you to customize your website easily. You can also create multiple user accounts with varying levels of permission for others to contribute content to your website.
Though there are many content management systems available out there (some of which have been listed in this article), we are going to go ahead with WordPress – the most popular CMS powering around 33% of the web.
Continue reading seven reasons why you should use WordPress over its competitors.
Quite some time back, I wrote a step-by-step guide on how to start a blog on WordPress. You can open it up in a new tab and scroll down to the ‘Installing WordPress’ section to find how to install WordPress on your hosting account. Though the tutorial primarily focuses on people choosing Bluehost to host their website, the process is nearly the same with all hosting providers.
Choosing a design for your website
There are more than two-thousand free themes and nearly 50,000 plugins available for you to use from WordPress’s official repositories (Theme Repository | Plugin Repository). Moreover, there are also quality commercial themes and plugins available like StudioPress Genesis Framework, ThemeIsle, and WP Astra.
Once you choose the desired theme for your website – you can install, activate and then start customizing it. You should now be having an active website with a good-looking theme on top of it.
Installing recommended plugins
Since your website is all new, you should start planning on strategies to gain traffic by optimizing it for both, your visitors and search engines. Moreover, you should extend the functionality of WordPress by installing the recommended additional plugins. Here are a few links for you to get started –
- How to Optimize WordPress for Search Engines
- 10 Best WordPress Plugins to Get More Traffic
- 25 Must-have WordPress plugins for Business Websites
- How to Enable Caching in WordPress
- How to Optimize WordPress to Reduce Server Load
- How to Supercharge WordPress using Jetpack Plugin
Conclusion
I do agree that not every step was crystal clear for you to understand but I hope you were able to connect the dots and figure out what it meant. It takes some time for you to understand all the steps and once you start creating a bunch of dummy sites, you will be able to master it. Thus I hope you were able to follow the above steps along with me in creating your first website successfully. If you’ve got any doubts or run into trouble, please feel free to leave a comment below.
Hello, I am Sharath PN and I’m new to blogging. I’m a Keralite hoping you too are a Keralite sir. Being sincere, I want to know how to use blogging as a way to pay for my study loan as Reliance Jio is giving affordable internet and am very glad to make use of it. Please give me some tips as I’m struggling to start.
Hey Sharath,
You can follow this post to learn how to make money online from blogging. It’s perfect for those who already have a blog but do not know how to monetize it.
Thank you Anto.
Thanks for writing this up…
You’re welcome Akshay. Hope you found it useful!