
Table of Contents
What are exit-intent popups
Exit-intent popups are those popups that are triggered to display a call-to-action message (can be a catchy message, a special discount/offer, or an email subscription form) when a visitor tries to leave your website, catching their attention just when they are done with the content on your website and about to leave.
How can exit-intent popups help you
By leveraging exit-intent popups, you can –
- Make visitors stay longer on your website
- Reduce your bounce rate
- Get more email subscribers
- Recover abandoned carts
- Generate leads for your business
- Increase overall revenue and conversion rates
Moreover, it doesn’t affect the user experience on your site since it fires only when the visitors are about to leave your site and not when they land first.
How to create an exit-intent popup in WordPress
To display exit-intent popups on your website, you need to install the OptinMonster WordPress plugin on your site. OptinMonster is one of the best WordPress popup and lead generation plugins out there. I have already covered its features in my OptinMonster review. Do check it out if you haven’t got OptinMonster yet. You can get OptinMonster from here.
But creating the popups from within your WordPress dashboard is not possible. You need to do that from your OptinMonster account. The plugin just acts as a connector between your site and OptinMonster.
Note: You need to be on the OptinMonster Pro plan or above to take advantage of the exit-intent feature.
Total Time: 30 minutes
Create new campaign
Once you have signed up for an OptinMonster Pro account, log in to your dashboard and click on the Create New Campaign button.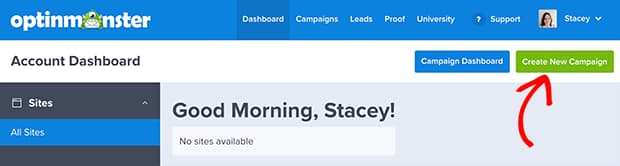
Choose campaign type
Then, choose your campaign type as Popup.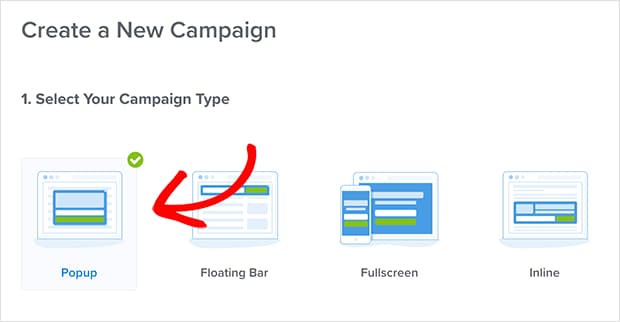
Select popup template
Once you have chosen the campaign type, you will be presented with a list of popup templates. You can choose any template you seem fit for your requirement.
Name your campaign
Give your campaign a name and choose your website from the dropdown.
Customize the popup
It will now take you to the campaign editor page from where you can fully customize the popup – A to Z. Don’t forget to keep saving your changes.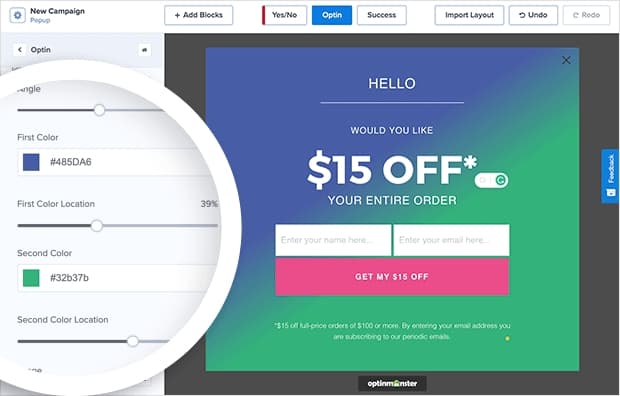
Choose display rules
Once you have customized the popup, click on the Display Rules button present on top of the campaign builder page. By default, the popup is configured to be displayed to site visitors five seconds after they land on the page. Change the ‘If…’ condition to exit detected. It can be done by clicking on the drop-down box, searching for ‘exit’, and clicking the Exit-Intent option.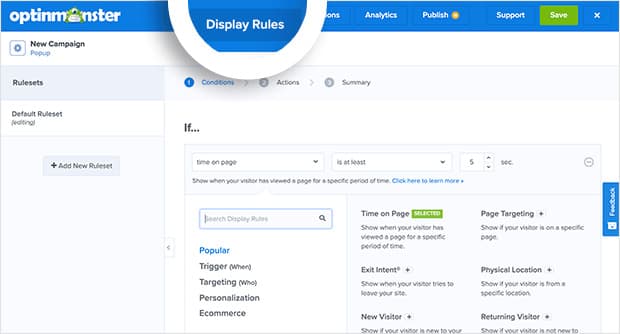
Select campaign view
After you have replaced the trigger to ‘If exit detected’ in the previous step, click on the Next Step button to choose the Then action for your popup. Make sure that Optin is selected from the drop-down menu, and click on the Next Step button.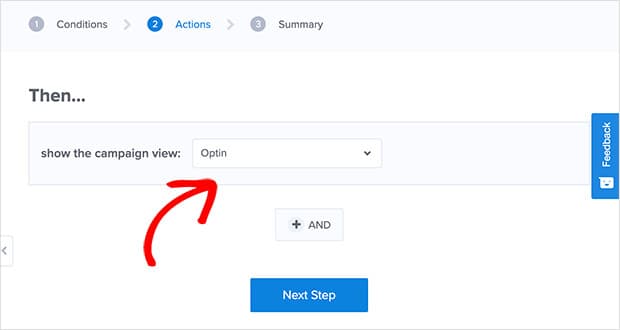
Integrate with your email marketing platform
You can ignore this step if you’re not collecting any details from the user. But if you are, you need to integrate OptinMonster with your email marketing platform to save the subscriber or lead details. If you haven’t created an email list yet, I’d recommend you go with GetResponse. Click on the Integrations button and click on Add New Integration to get started.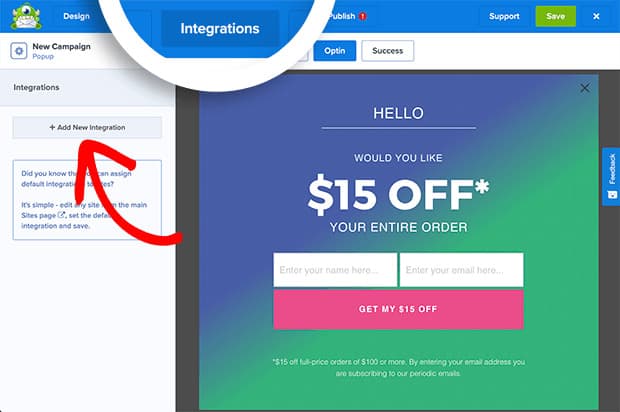
Publish the popup
That’s it, you are now ready to publish your exit-intent popup campaign that we just created. Hurray! 🥳
Note: You have now successfully created an exit-intent popup on your WordPress site. If you don’t intend to collect email addresses or there’s some other use case – like promoting your latest sale or reminding people to check out your latest clothing collection, you can use a different template that doesn’t require you to collect email addresses. Also, you could just remove the name and email fields and make use of other designs. Either way, OptinMonster has got you covered.
So, what are you waiting for? Go ahead and get OptinMonster now!
(comes with 14 days money back guarantee)
P.S. Since OptinMonster is a SaaS (Software as a Service) product, you can use it to boost sales and generate more leads not only on your WordPress site but also on your Shopify and other web publishing/eCommerce platforms. Get creative!