
Some time back I had shared Genesis Framework review on my blog where I had mentioned that Genesis is a highly customizable theme framework for WordPress which gives you complete control over your website. But the process of customizing your site’s entry meta and footer credits has not always been straightforward. If you are a WordPress developer you would have already figured out how to modify them but as a regular WordPress user, you aren’t sure how to edit them mainly because the plugins which work on other WordPress sites to customize them doesn’t work as intended on Genesis. This is partly because of the way how Genesis works.
But hey, worry not. The Genesis Framework has got its own set of plugins available on the WordPress plugins repository which will help you customize your Genesis powered WordPress site without adding any bloat. In this post, I will show you how to change entry meta and footer credits in the Genesis Framework using two methods – one using a simple WordPress plugin and the other with the help of some code.
Table of Contents
What is entry meta in Genesis Framework
Entry meta refers to all the extra information about your WordPress posts like its author name, published date, last updated date, tags and categories it was filed under, etc. Most of the times the post’s author name and date published would be output above the post and the tags and categories would be output below the post.
Try visiting your single post page after installing the Genesis Framework and you will know what I’m talking about. In the below screenshots of the Generate Pro theme, you can see them in action on the frontend.
There are primarily two places where the entry meta are displayed – above the post and below the post.
Entry meta above the content – It shows the article’s published date, author’s name along with a link to the author’s archives, and a link to the comments section.

Entry meta below the content – It displays the category under which the article is filed under and its tags. Remember that a post can belong to more than one category but it is generally recommended to keep it under two or three categories. The same applies to tags too. Don’t tag your posts with too many terms and keep it under five or six.

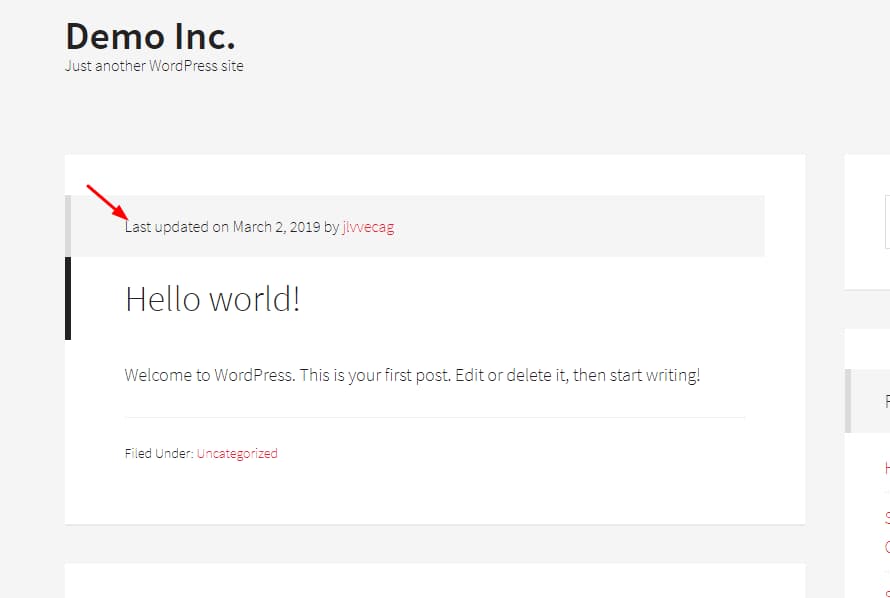
You might wonder what’s wrong with Genesis Framework’s entry meta and why we should customize it. Well, even though it works well out of the box some would prefer to tweak a few things here and there. Personally I myself display the last updated date on my posts rather than displaying the date the post was actually published.
This helps me convey to my readers when a particular post on my site was last updated by me. Also, search engines can see when the article was last updated and it may improve your Google rankings. And I don’t display the tags under my posts because I don’t think it adds any value to the readers. It just takes up some extra space and looks odd under the post. Well, it’s just my opinion. Feel free to tell me how it can be helpful in the comments section below.
Now, let’s have a look at Genesis Framework’s site footer.
What is site footer in the Genesis Framework
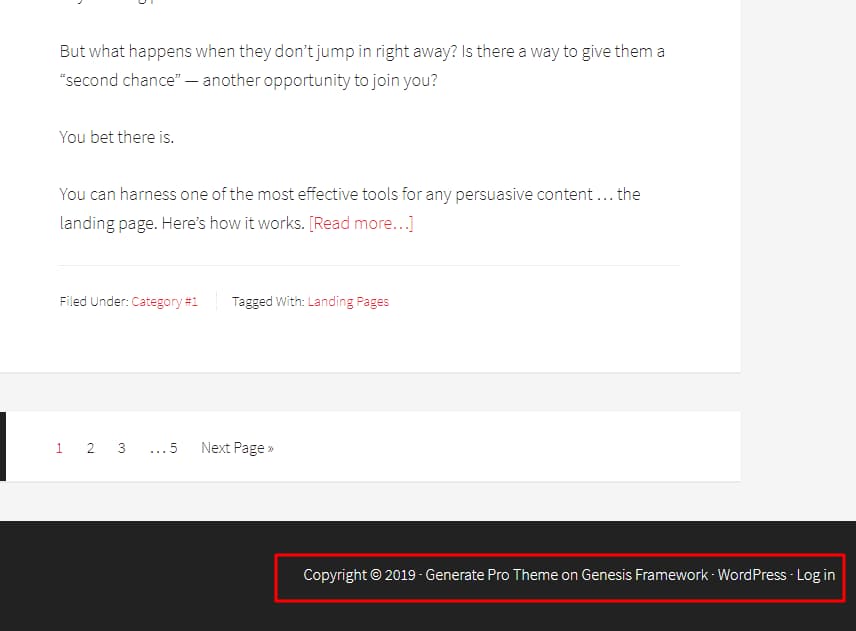
You might have already guessed what it is from the name itself but I’m going to explain it anyway. So, if you want to save some time you may jump to the next section where I explain how to customize the Genesis site footer and change the site credits from the default text which goes like ‘Copyright © <Year> · <Theme Name> on Genesis Framework · WordPress · Log in’.
By default, Genesis shows the current copyright year, a link to your Genesis child theme, the Genesis Framework, and your standard WordPress login page (wp-login.php).
If you want, you can customize the text using the below methods because not everyone likes the standard footer credits. The main reason why many people would want to customize the Genesis footer credits section is that it doesn’t display the site name in the copyright section. And not everyone wants to display a link to their site’s login page to the public. Some even consider it as a security issue!
How to customize Genesis entry meta and footer credits
Method 1 – Using Genesis Simple Edits
Learn how to customize Genesis Framework’s entry meta and footer credits using the Genesis Simple Edits plugin.
Total Time: 15 minutes
Install Genesis Simple Edits
Go to the add new plugins section on your WordPress site, search for Genesis Simple Edits and hit the install button.
Activate Genesis Simple Edits
Activate the plugin once it is fully installed.
Open Genesis Simple Edits settings page
Now, find the Genesis Simple Edits plugin settings under your Genesis Framework settings page. From there, you can customize your site’s entry meta (both above and below the content) and your website’s footer.
Display last updated date
To display the last updated date in your posts, use the below syntax
Remove taxonomies
To remove post categories and tags from your single post entries, clear the content present in the Entry Meta (below content) field.
View all shortcodes
To view all the shortcodes that can be used for entry meta, click on the hyperlink that says ‘Show available entry meta shortcodes’.
Change website footer text using shortcode
To customize your website’s footer, you can use the below shortcode in the Footer Credits Text field. It will display only the copyright year.
Change website footer text using HTML
If you don’t feel comfortable working with shortcodes, you can enter custom HTML in the Footer Output box. But make sure that you have checked the box that says ‘Modify Entire Footer Text (including markup)?’.
Sample HTML code
Usually, the HTML code will look something like this –
Save changes
You can use the above text if you want. Just change the URL and the accompanying text. Once you have done that, don’t forget to save the changes.
Check last updated date
Now, it’s time for you to check out the changes you have done from the front end. You can notice that the entry meta above the content will display the last updated date.
Check website footer credits
And the site footer will output the newly updated footer credits. That’s it, you have now successfully changed the entry meta and footer credits on your Genesis site by using a simple WordPress plugin.
Method 2 – Using code
If you don’t want to rely on a plugin to edit your entry meta and site footer, worry not. I’ve got you covered. You can add the below code snippets directly to your site’s functions.php to change entry meta and footer credits in Genesis Framework file but make sure you’ve taken a full backup of your website before editing the file.
But if you would ask me, I would suggest you to use a WordPress functionality plugin like Code Snippets to add the below code snippets to your site. It is safe and you can choose to run the code just once to see if it’s working as intended.
Entry meta above the content
To display the last updated date on your posts, you can add the below code to your site’s functions.php file.
Once you have updated the file, it should work as intended. Here’s a screenshot for your reference –
Entry meta below content
You can use the below code snippet to prevent Genesis Framework from displaying categories and tags below your blog posts.
This will remove the entry meta below the content from your posts, the home page, and the archive pages. Simply add it to your functions.php file and update it.
Footer Credits
For customizing the Genesis footer credits, you can use the below code snippet from StudioPress.
After saving the changes it should look like this in the below screenshot. Anyway, don’t forget to change the anchor text and the link to suit your preferences.

Which method is the best?
If you are a beginner, I would recommend you to use the Genesis Simple Edits WordPress plugin. It is the simplest method to edit the entry meta and footer credits in the Genesis Framework. Moreover, you needn’t worry about keeping the code up to date.
But if you are feeling adventurous, you can use the code snippets and paste them manually to your website’s functions.php file. Both methods should work fine.
I hope you found this post helpful in learning how to change entry meta and footer credits in Genesis Framework and enjoyed the read. If you did, please consider sharing this post with your fellow bloggers and Genesis Framework users on social media.
How do you delete the entry meta from generate theme. The grey bar the padding all of it.
Hello Brendan, if you just want to hide the entry meta from Generate Pro child theme, you can use the following CSS code instead of customizing it. Open your WordPress Customizer and paste the following code under the ‘Additional CSS’ section –
p.entry-meta { display: none; }Hope that helps.