
Once upon a time, popups were simple and straightforward. You display one on your website and your site visitors decide whether or not to give your email address. It could be for anything – email list, free e-books, giveaways, etc.
But nowadays, that doesn’t seem to be working. People have learned to ignore it by instantly clicking outside the popup area to close it. Most of the time, they don’t even read what you are offering. That hurts, doesn’t it?
That’s where multi-step forms come to your rescue. It’s simple and easy to create; but most of all, it doesn’t hurt the user experience on your site. Since the first step usually involves a Yes or No question and is really short, people who might be genuinely interested in what you are offering might not miss it.
Table of Contents
What is a multi-step popup
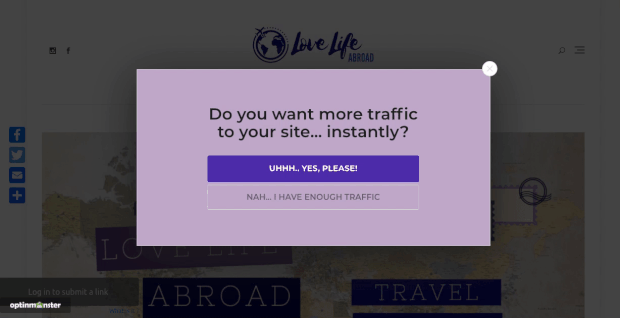
A multi-step popup is a popup where there are multiple steps are involved – usually two to three steps depending on whether the reader is interested. Usually, a simple question is displayed on the screen with two options to answer that – a yes or a no but the wording might be creative (like ‘Yes, send me the goddamn ebook‘ or ‘Nah, not interested‘). Or here’s one you might have seen already – Yes, I want to become a pro blogger or No, I don’t want to become a pro blogger. There are quite a few examples that you might have already come across.
If the reader clicks yes, the actual popup message is displayed where the email is collected and then, a success message is displayed. If the reader clicks no, the popup will be dismissed in most of the cases. But some people might get creative with that part and make an offer you can’t refuse. Get that Godfather reference? 😉
What plugin do you need to create a multi-step popup
To create a multi-step popup on your WordPress site, you need OptinMonster – the best popup and lead generation plugin for your WordPress site. You might have heard many good things about them already. They are the ones that made exit-intent popups popular in the WordPress ecosystem. And that was when many marketers began taking WordPress seriously as a lead generation platform.
Thanks to them, many plugin developers started focusing on developing good lightweight popup plugins after seeing the demand. But they are still in the number one position because of their out of the box features, templates, and pricing. I have covered all about it in my OptinMonster review. You might also be interested in my other posts covering OptinMonster’s features like content locking and spin-to-win lucky wheel.
(Comes with 14 days money back guarantee)
How to create a multi-step popup
Guide to create a multi-step popup tutorial –
Total Time: 20 minutes
Create new campaign
Login to your OptinMonster account and click on the Create New Campaign button in the top right corner. Remember that the WordPress plugin acts only as a connection between your site and OptinMonster.com. You will have to create the popups from their website.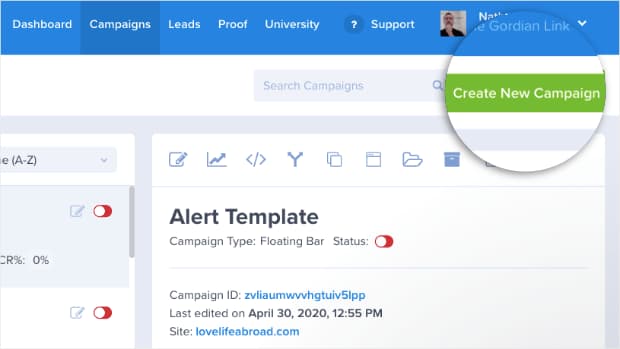
Select campaign type
You can now select your campaign type. For the sake of this tutorial, let’s go with the Popup campaign. But just know that you can use OptinMonster to create many other campaign types for lead generation or promotion.
Choose a template
You can now choose a ready-made template for your campaign although you can still start from scratch using Canvas. You can find the best template from the list using filters based on use cases. You can also find mobile-optimized templates from the list if that’s your thing. I’m going with the Basic template.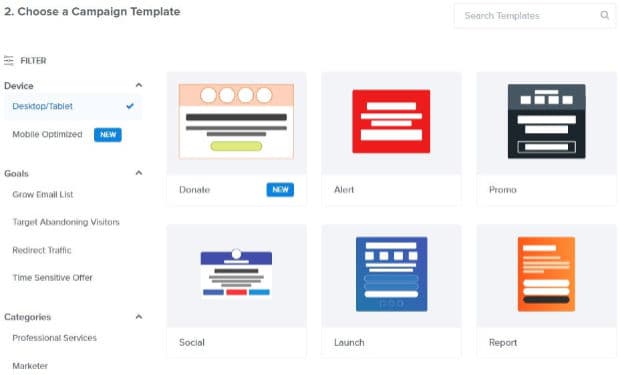
Name your popup campaign
Give your popup campaign a name, choose the website on which you intend to deploy it, and click on Start Building. You can manage popups for all your websites from one place and that is your OptinMonster dashboard.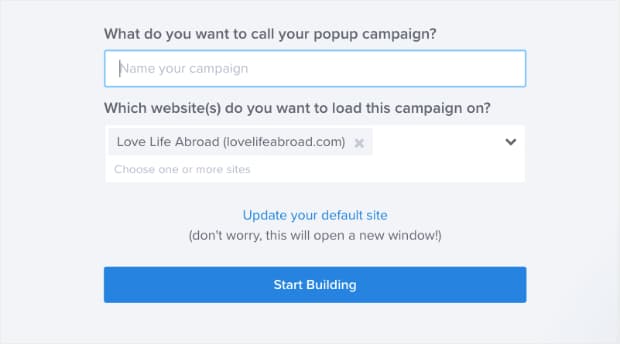
Design and customize your popup
You can now view the template loaded onto your OptinMonster editor screen. From here you can design and customize how your popup looks like and what it displays. You can always come back to this screen to improvize its looks and the content that is displayed.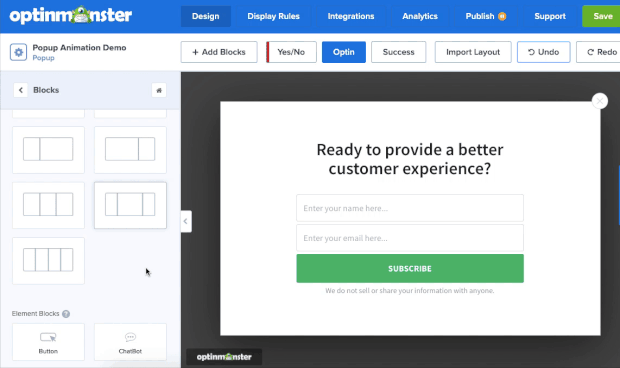
Add Yes/No button
From the top of your editor, click on the Yes/No option and click on the Enable Yes/No for This Campaign which will create a new page in your popup campaign. You can customize everything on this page too. So, get creative!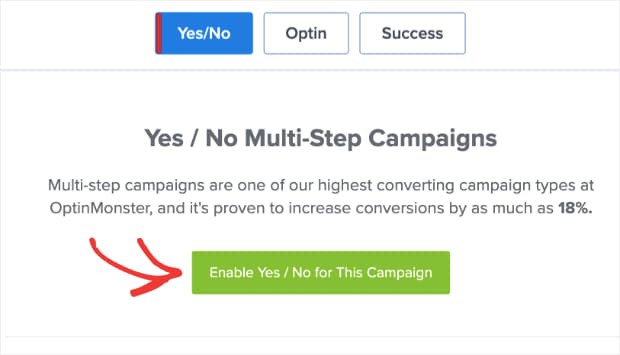
Set display rules
Click on the Display Rules option from the top of the editor screen to customize when you want the multi-step popup to be displayed. The default criteria are good but I prefer to go with exit-intent technology. That is, the popup will be displayed when the user is going to leave your website. And the best part about it is, you can enable it for both desktop and mobile devices. There are a whole lot of conditions you can tweak to modify when and how your popup is displayed – just go through them and experiment. That’s my suggestion.
Finally, save and publish your campaign.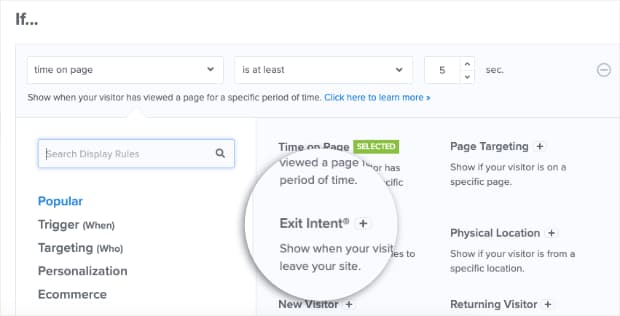
That’s it, you have now successfully created a multi-step popup on your WordPress site. But remember that this is just the beginning, you can use OptinMonster to do a lot more than that. You’ll get to know more about its features as you start exploring it. I’ll also share more updates on its features as and when possible.